https://pyimagesearch.com/2018/06/18/face-recognition-with-opencv-python-and-deep-learning/#pyis-cta-modal
Note: For the following installs, ensure you are in a Python virtual environment if you’re using one. I highly recommend virtual environments for isolating your projects — it is a Python best practice. If you’ve followed my OpenCV install guides (and installed
command prior to installing dlib and face_recognition.
Face recognition with OpenCV, Python, and deep learning
Inside this tutorial, you will learn how to perform facial recognition using OpenCV, Python, and deep learning.
We’ll start with a brief discussion of how deep learning-based facial recognition works, including the concept of “deep metric learning.”
From there, I will help you install the libraries you need to actually perform face recognition.
Finally, we’ll implement face recognition for both still images and video streams.
As we’ll discover, our face recognition implementation will be capable of running in real-time.
Understanding deep learning face recognition embeddings
So, how does deep learning + face recognition work?
The secret is a technique called deep metric learning.
If you have any prior experience with deep learning you know that we typically train a network to:
- Accept a single input image
- And output a classification/label for that image
However, deep metric learning is different.
Instead, of trying to output a single label (or even the coordinates/bounding box of objects in an image), we are instead outputting a real-valued feature vector.
For the dlib facial recognition network, the output feature vector is 128-d (i.e., a list of 128 real-valued numbers) that is used to quantify the face. Training the network is done using triplets:
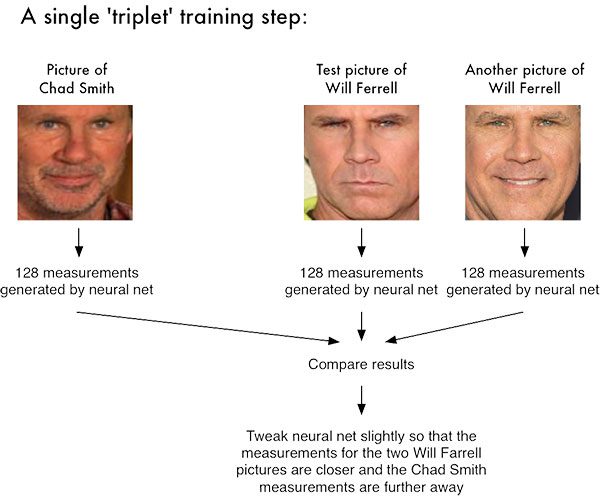
Here we provide three images to the network:
- Two of these images are example faces of the same person.
- The third image is a random face from our dataset and is not the same person as the other two images.
As an example, let’s again consider Figure 1 where we provided three images: one of Chad Smith and two of Will Ferrell.
Our network quantifies the faces, constructing the 128-d embedding (quantification) for each.
From there, the general idea is that we’ll tweak the weights of our neural network so that the 128-d measurements of the two Will Ferrel will be closer to each other and farther from the measurements for Chad Smith.
Our network architecture for face recognition is based on ResNet-34 from the Deep Residual Learning for Image Recognition paper by He et al., but with fewer layers and the number of filters reduced by half.
The network itself was trained by Davis King on a dataset of ≈3 million images. On the Labeled Faces in the Wild (LFW) dataset the network compares to other state-of-the-art methods, reaching 99.38% accuracy.
Both Davis King (the creator of dlib) and Adam Geitgey (the author of the face_recognition module we’ll be using shortly) have written detailed articles on how deep learning-based facial recognition works:
- High Quality Face Recognition with Deep Metric Learning (Davis)
- Modern Face Recognition with Deep Learning (Adam)
I would highly encourage you to read the above articles for more details on how deep learning facial embeddings work.
Install your face recognition libraries
In order to perform face recognition with Python and OpenCV we need to install two additional libraries:
The dlib library, maintained by Davis King, contains our implementation of “deep metric learning” which is used to construct our face embeddings used for the actual recognition process.
The
library, created by Adam Geitgey, wraps around dlib’s facial recognition functionality, making it easier to work with.
I assume that you have OpenCV installed on your system. If not, no worries — just visit my OpenCV install tutorials page and follow the guide appropriate for your system.
From there, let’s install
and the
packages.
Note: For the following installs, ensure you are in a Python virtual environment if you’re using one. I highly recommend virtual environments for isolating your projects — it is a Python best practice. If you’ve followed my OpenCV install guides (and installed
+
) then you can use the
command prior to installing
and
.
Installing dlib without GPU support
If you do not have a GPU you can install
using pip by following this guide:
→ Launch Jupyter Notebook on Google Colab
Or you can compile from source:
→ Launch Jupyter Notebook on Google Colab
Installing dlib with GPU support (optional)
If you do have a CUDA compatible GPU you can install
with GPU support, making facial recognition faster and more efficient.
For this, I recommend installing
from source as you’ll have more control over the build:
→ Launch Jupyter Notebook on Google Colab
Install the face_recognition package
The face_recognition module is installable via a simple pip command:
→ Launch Jupyter Notebook on Google Colab
Install imutils
You’ll also need my package of convenience functions, imutils. You may install it in your Python virtual environment via pip:
→ Launch Jupyter Notebook on Google Colab
Our face recognition dataset
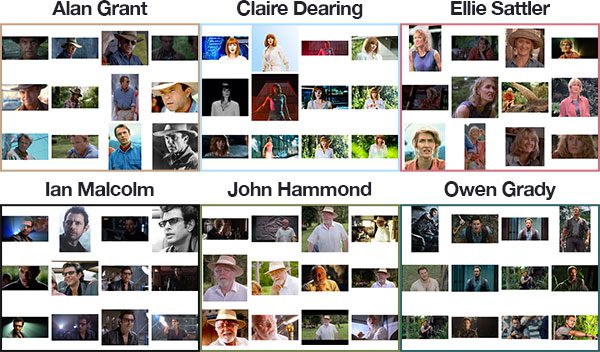
Since Jurassic Park (1993) is my favorite movie of all time, and in honor of Jurassic World: Fallen Kingdom (2018) being released this Friday in the U.S., we are going to apply face recognition to a sample of the characters in the films:
- Alan Grant, paleontologist (22 images)
- Claire Dearing, park operations manager (53 images)
- Ellie Sattler, paleobotanist (31 images)
- Ian Malcolm, mathematician (41 images)
- John Hammond, businessman/Jurassic Park owner (36 images)
- Owen Grady, dinosaur researcher (35 images)
This dataset was constructed in < 30 minutes using the method discussed in my How to (quickly) build a deep learning image dataset tutorial. Given this dataset of images we’ll:
- Create the 128-d embeddings for each face in the dataset
- Use these embeddings to recognize the faces of the characters in both images and video streams
Face recognition project structure
Our project structure can be seen by examining the output from the
command:
→ Launch Jupyter Notebook on Google Colab
Our project has 4 top-level directories:
- dataset/: Contains face images for six characters organized into subdirectories based on their respective names.
- examples/: Has three face images for testing that are not in the dataset.
- output/: This is where you can store your processed face recognition videos. I’m leaving one of mine in the folder — the classic “lunch scene” from the original Jurassic Park movie.
- videos/: Input videos should be stored in this folder. This folder also contains the “lunch scene” video but it hasn’t undergone our face recognition system yet.
We also have 6 files in the root directory:
- search_bing_api.py: Step 1 is to build a dataset (I’ve already done this for you). To learn how to use the Bing API to build a dataset with my script, just see this blog post.
- encode_faces.py: Encodings (128-d vectors) for faces are built with this script.
- recognize_faces_image.py: Recognize faces in a single image (based on encodings from your dataset).
- recognize_faces_video.py: Recognize faces in a live video stream from your webcam and output a video.
- recognize_faces_video_file.py: Recognize faces in a video file residing on disk and output the processed video to disk. I won’t be discussing this file today as the bones are from the same skeleton as the video stream file.
- encodings.pickle: Facial recognitions encodings are generated from your dataset viaencode_faces.pyand then serialized to disk.
After a dataset of images is created (with
), we’ll run
to build the embeddings.
From there, we’ll run the recognize scripts to actually recognize the faces.
Encoding the faces using OpenCV and deep learning
face_recognition module method generates a 128-d real-valued number feature vector per face.Before we can recognize faces in images and videos, we first need to quantify the faces in our training set. Keep in mind that we are not actually training a network here — the network has already been trained to create 128-d embeddings on a dataset of
million images.
We certainly could train a network from scratch or even fine-tune the weights of an existing model but that is more than likely overkill for many projects. Furthermore, you would need a lot of images to train the network from scratch.
Instead, it’s easier to use the pre-trained network and then use it to construct 128-d embeddings for each of the 218 faces in our dataset.
Then, during classification, we can use a simple k-NN model + votes to make the final face classification. Other traditional machine learning models can be used here as well.
To construct our face embeddings open up
from the “Downloads” associated with this blog post:
→ Launch Jupyter Notebook on Google Colab
First, we need to import required packages. Again, take note that this script requires
,
, and OpenCV installed. Scroll up to the “Install your face recognition libraries” to make sure you have the libraries ready to go on your system.
Let’s handle our command line arguments that are processed at runtime with
:
→ Launch Jupyter Notebook on Google Colab
If you’re new to PyImageSearch, let me direct your attention to the above code block which will become familiar to you as you read more of my blog posts. We’re using
to parse command line arguments. When you run a Python program in your command line, you can provide additional information to the script without leaving your terminal. Lines 10-17 do not need to be modified as they parse input coming from the terminal. Check out my blog post about command line arguments if these lines look unfamiliar.
Let’s list out the argument flags and discuss them:
- --dataset: The path to our dataset (we created a dataset withsearch_bing_api.pydescribed in method #2 of last week’s blog post).
- --encodings: Our face encodings are written to the file that this argument points to.
- --detection-method: Before we can encode faces in images we first need to detect them. Or two face detection methods include eitherhogorcnn. Those two flags are the only ones that will work for--detection-method.
Now that we’ve defined our arguments, let’s grab the paths to the files in our dataset (as well as perform two initializations):
→ Launch Jupyter Notebook on Google Colab
Line 21 uses the path to our input dataset directory to build a list of all
contained therein.
We also need to initialize two lists before our loop,
and
, respectively. These two lists will contain the face encodings and corresponding names for each person in the dataset (Lines 24 and 25).
It’s time to begin looping over our Jurassic Park character faces!
→ Launch Jupyter Notebook on Google Colab
This loop will cycle 218 times corresponding to our 218 face images in the dataset. We’re looping over the paths to each of the images on Line 28.
From there, we’ll extract the
of the person from the
(as our subdirectory is named appropriately) on Line 32.
Then let’s load the
while passing the
to
(Line 36).
OpenCV orders color channels in BGR, but the
actually expects RGB. The
module uses
, so before we proceed, let’s swap color spaces on Line 37, naming the new image
.
Next, let’s localize the face and compute encodings:
→ Launch Jupyter Notebook on Google Colab
This is the fun part of the script!
For each iteration of the loop, we’re going to detect a face (or possibly multiple faces and assume that it is the same person in multiple locations of the image — this assumption may or may not hold true in your own images so be careful here).
For example, let’s say that
contains a picture (or pictures) of Ellie Sattler’s face.
Lines 41 and 42 actually find/localize the faces of her resulting in a list of face
. We pass two parameters to the
method:
- rgb: Our RGB image.
- model: Eithercnnorhog(this value is contained within our command line arguments dictionary associated with the"detection_method"key). The CNN method is more accurate but slower. HOG is faster but less accurate.
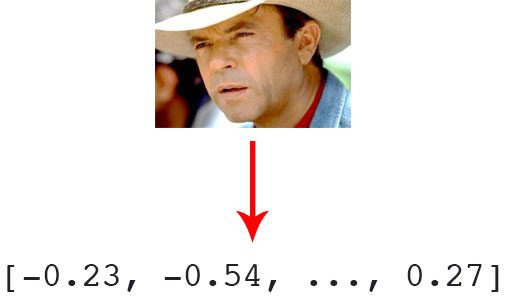
Then, we’re going to turn the bounding
of Ellie Sattler’s face into a list of 128 numbers on Line 45. This is known as encoding the face into a vector and the
method handles it for us.
From there we just need to append the Ellie Sattler
and
to the appropriate list (
and
).
We’ll continue to do this for all 218 images in the dataset.
What would be the point of encoding the images unless we could use the
in another script which handles the recognition?
Let’s take care of that now:
→ Launch Jupyter Notebook on Google Colab
Line 56 constructs a dictionary with two keys —
and
.
From there Lines 57-59 dump the names and encodings to disk for future recall.
How should I run the
script in the terminal?
To create our facial embeddings open up a terminal and execute the following command:
→ Launch Jupyter Notebook on Google Colab
As you can see from our output, we now have a file named
— this file contains the 128-d face embeddings for each face in our dataset.
On my Titan X GPU, processing the entire dataset took a little over a minute, but if you’re using a CPU, be prepared to wait awhile for this script complete!
On my Macbook Pro (no GPU), encoding 218 images required 21min 20sec.
You should expect much faster speeds if you have a GPU and compiled dlib with GPU support.
Recognizing faces in images
face_recognition Python module.Now that we have created our 128-d face embeddings for each image in our dataset, we are now ready to recognize faces in image using OpenCV, Python, and deep learning.
Open up
and insert the following code (or better yet, grab the files and image data associated with this blog post from the “Downloads” section found at the bottom of this post, and follow along):
→ Launch Jupyter Notebook on Google Colab
This script requires just four imports on Lines 2-5. The
module will do the heavy lifting and OpenCV will help us to load, convert, and display the processed image.
We’ll parse three command line arguments on Lines 8-15:
- --encodings: The path to the pickle file containing our face encodings.
- --image: This is the image that is undergoing facial recognition.
- --detection-method: You should be familiar with this one by now — we’re either going to use ahogorcnnmethod depending on the capability of your system. For speed, choosehogand for accuracy, choosecnn.
IMPORTANT! If you are:
- Running the face recognition code on a CPU
- OR you using a Raspberry Pi
- …you’ll want to set the --detection-methodtohogas the CNN face detector is (1) slow without a GPU and (2) the Raspberry Pi won’t have enough memory to run the CNN either.
From there, let’s load the pre-computed encodings + face names and then construct the 128-d face encoding for the input image:
→ Launch Jupyter Notebook on Google Colab
Line 19 loads our pickled encodings and face names from disk. We’ll need this data later during the actual face recognition step.
Then, on Lines 22 and 23 we load and convert the input
to
color channel ordering (just as we did in the
script).
We then proceed to detect all faces in the input image and compute their 128-d
on Lines 29-31 (these lines should also look familiar).
Now is a good time to initialize a list of
for each face that is detected — this list will be populated in the next step.
Next, let’s loop over the facial
:
→ Launch Jupyter Notebook on Google Colab
On Line 37, we begin to loop over the face encodings computed from our input image.
Then the facial recognition magic happens!
We attempt to match each face in the input image (
) to our known encodings dataset (held in
) using
(Lines 40 and 41).
This function returns a list of
/
values, one for each image in our dataset. For our Jurassic Park example, there are 218 images in the dataset and therefore the returned list will have 218 boolean values.
Internally, the
function is computing the Euclidean distance between the candidate embedding and all faces in our dataset:
- If the distance is below some tolerance (the smaller the tolerance, the more strict our facial recognition system will be) then we return True, indicating the faces match.
- Otherwise, if the distance is above the tolerance threshold we return Falseas the faces do not match.
Essentially, we are utilizing a “more fancy” k-NN model for classification. Be sure to refer to the compare_faces implementation for more details.
The
variable will eventually hold the name string of the person — for now, we leave it as
in case there are no “votes” (Line 42).
Given our
list we can compute the number of “votes” for each name (number of
values associated with each name), tally up the votes, and select the person’s name with the most corresponding votes:
→ Launch Jupyter Notebook on Google Colab
If there are any
votes in
(Line 45) we need to determine the indexes of where these
values are in
. We do just that on Line 49 where we construct a simple list of
which might look like this for
:
→ Launch Jupyter Notebook on Google Colab
We then initialize a dictionary called
which will hold the character name as the key the number of votes as the value (Line 50).
From there, let’s loop over the
and set the value associated with each name while incrementing it as necessary in
. The
dictionary might look like this for a high vote score for Ian Malcolm:
→ Launch Jupyter Notebook on Google Colab
Recall that we only have 41 pictures of Ian in the dataset, so a score of 40 with no votes for anybody else is extremely high.
Line 61 extracts the name with the most votes from
, in this case, it would be
.
The second iteration of our loop (as there are two faces in our example image) of the main facial encodings loop yields the following for
:
→ Launch Jupyter Notebook on Google Colab
That is definitely a smaller vote score, but still, there is only one name in the dictionary so we likely have found Alan Grant.
Note: The PDB Python Debugger was used to verify values of the
dictionary. PDB usage is outside the scope of this blog post; however, you can discover how to use it on the Python docs page.
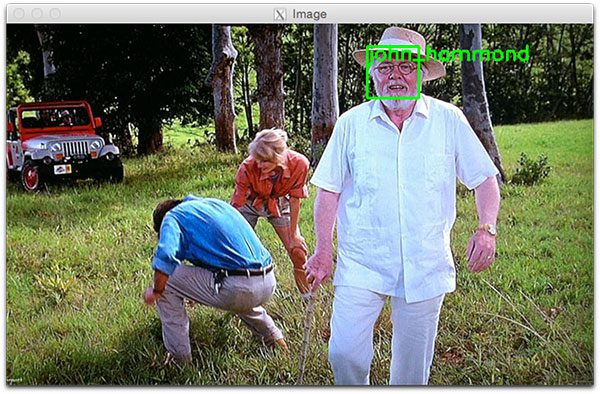
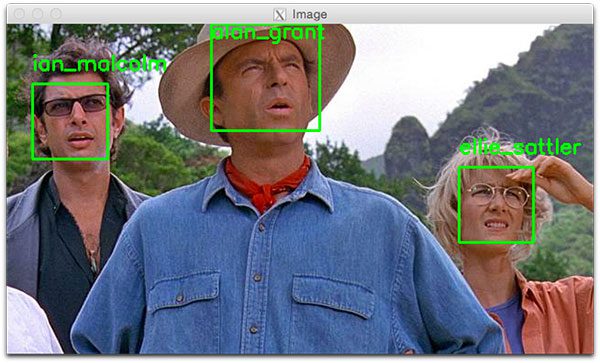
As shown in Figure 5 below, both Ian Malcolm and Alan Grant have been correctly recognized, so this part of the script is working well.
Let’s move on and loop over the bounding boxes and labeled names for each person and draw them on our output image for visualization purposes:
→ Launch Jupyter Notebook on Google Colab
On Line 67, we begin looping over the detected face bounding
and predicted
. To create an iterable object so we can easily loop through the values, we call
resulting in tuples that we can extract the box coordinates and name from.
We use the box coordinates to draw a green rectangle on Line 69.
We also use the coordinates to calculate where we should draw the text for the person’s name (Line 70) followed by actually placing the name text on the image (Lines 71 and 72). If the face bounding box is at the very top of the image, we need to move the text below the top of the box (handled on Line 70), otherwise, the text would be cut off.
We then proceed to display the image until a key is pressed (Lines 75 and 76).
How should you run the facial recognition Python script?
Using your terminal, first ensure you’re in your respective Python correct virtual environment with the
command (if you are using a virtual environment, of course).
Then run the script while providing the two command line arguments at a minimum. If you choose to use the HoG method, be sure to pass
as well (otherwise it will default to the deep learning detector).
Let’s go for it!
To recognize a face using OpenCV and Python open up your terminal and execute our script:
→ Launch Jupyter Notebook on Google Colab

A second face recognition example follows:
→ Launch Jupyter Notebook on Google Colab
Recognizing faces in video
Now that we have applied face recognition to images let’s also apply face recognition to videos (in real-time) as well.
Important Performance Note: The CNN face recognizer should only be used in real-time if you are working with a GPU (you can use it with a CPU, but expect less than 0.5 FPS which makes for a choppy video). Alternatively (you are using a CPU), you should use the HoG method (or even OpenCV Haar cascades covered in a future blog post) and expect adequate speeds.
The following script draws many parallels from the previous
script. Therefore I’ll be breezing past what we’ve already covered and just review the video components so that you understand what is going on.
Once you’ve grabbed the “Downloads”, open up
and follow along:
→ Launch Jupyter Notebook on Google Colab
We import packages on Lines 2-8 and then proceed to parse our command line arguments on Lines 11-20.
We have four command line arguments, two of which you should recognize from above (
and
). The other two arguments are:
- --output: The path to the output video.
- --display: A flag which instructs the script to display the frame to the screen. A value of1displays and a value of0will not display the output frames to our screen.
From there we’ll load our encodings and start our
:
→ Launch Jupyter Notebook on Google Colab
To access our camera we’re using the
class from imutils. Line 29 starts the stream. If you have multiple cameras on your system (such as a built-in webcam and an external USB cam), you can change the
to
and so forth.
We’ll be optionally writing processed video frames to disk later, so we initialize
to
(Line 30). Sleeping for 2 complete seconds allows our camera to warm up (Line 31).
From there we’ll start a
loop and begin to grab and process frames:
→ Launch Jupyter Notebook on Google Colab
Our loop begins on Line 34 and the first step we take is to grab a
from the video stream (Line 36).
The remaining Lines 40-50 in the above code block are nearly identical to the lines in the previous script with the exception being that this is a video frame and not a static image. Essentially we read the
, preprocess, and then detect face bounding
+ calculate
for each bounding box.
Next, let’s loop over the facial
associated with the faces we have just found:
→ Launch Jupyter Notebook on Google Colab
In this code block, we loop over each of the
and attempt to match the face. If there are matches found, we count the votes for each name in the dataset. We then extract the highest vote count and that is the name associated with the face. These lines are identical to the previous script we reviewed, so let’s move on.
In this next block, we loop over the recognized faces and proceed to draw a box around the face and the display name of the person above the face:
→ Launch Jupyter Notebook on Google Colab
Those lines are identical too, so let’s focus on the video-related code.
Optionally, we’re going to write the frame to disk, so let’s see how writing video to disk with OpenCV works:
→ Launch Jupyter Notebook on Google Colab
Assuming we have an output file path provided in the command line arguments and we haven’t already initialized a video
(Line 99), let’s go ahead and initialize it.
On Line 100, we initialize the
. FourCC is a 4-character code and in our case, we’re going to use the “MJPG” 4-character code.
From there, we’ll pass that object into the
along with our output file path, frames per second target, and frame dimensions (Lines 101 and 102).
Finally, if the
exists, we can go ahead and write a frame to disk (Lines 106-107).
Let’s handle whether or not we should display the face recognition video frames on the screen:
→ Launch Jupyter Notebook on Google Colab
If our display command line argument is set, we go ahead and display the frame (Line 112) and check if the quit key (
) has been pressed (Lines 113-116), at which point we’d
out of the loop (Line 117).
Lastly, let’s perform our housekeeping duties:
→ Launch Jupyter Notebook on Google Colab
In Lines 120-125, we clean up and release the display, video stream, and video writer.
Are you ready to see the script in action?
To demonstrate real-time face recognition with OpenCV and Python in action, open up a terminal and execute the following command:
→ Launch Jupyter Notebook on Google Colab
Below you can find an output example video that I recorded demonstrating the face recognition system in action:

Face recognition in video files
As I mentioned in our “Face recognition project structure” section, there’s an additional script included in the “Downloads” for this blog post —
.
This file is essentially the same as the one we just reviewed for the webcam except it will take an input video file and generate an output video file if you’d like.
I applied our face recognition code to the popular “lunch scene” from the original Jurassic Park movie where the cast is sitting around a table sharing their concerns with the park:
→ Launch Jupyter Notebook on Google Colab
Here’s the result:

Note: Recall that our model was trained on four members of the original cast: Alan Grant, Ellie Sattler, Ian Malcolm, and John Hammond. The model was not trained on Donald Gennaro (the lawyer) which is why his face is labeled as “Unknown”. This behavior was by design (not an accident) to show that our face recognition system can recognize faces it was trained on while leaving faces it cannot recognize as “Unknown”.
And in the following video I have put together a “highlight reel” of Jurassic Park and Jurassic World clips, mainly from the trailers:

As we can see, we can see, our face recognition and OpenCV code works quite well!
No comments:
Post a Comment